Dear Staff,
I opened up a new storage server mainly for storing scans. This will serve as the new centralized location for hosting scans for all parts of the website.
Background Information
As some of you know, we were using Gitlab for managing the scans, it was working nicely at first, but then it become a common friction point. First of all, Git is not something that was designed for this purpose. Secondly, to contribute something, it is mandatory to download the entire repository on your computer, together with the metadata and old versions which are not needed, the space requirements are nearing 15GiB, which suggests an overkill, thus we needed a new system.
New Setup
We will store the scans on minio, an open source S3-like object storage server. I have been using it for other projects, and it works surprisingly well. It will first start working in hybrid legacy mode with the existing URL scheme, later on I will upgrade all systems to directly point to it to completely decouple it from the legacy system.
Connection Instructions
Note: Below part is only relevant for Staff users who have received their credentials (access key and secret) from me. If you want to help out for uploading scans, please reach out to me.
 IMPORTANT : Always TRIPLE CHECK what operation are you performing and which directory you are in, this system does not have the safety nets of Git and if you are careless you may cause permanent loss of images on the production server!
Syncing up: Also, in case of new sets, please make sure to sync with other members such that you won’t do the same operation at the same time
-
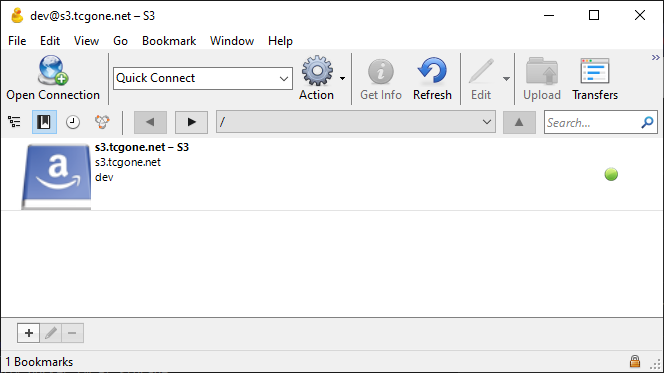
You will need to use a desktop tool that connects to S3 like APIs. If you haven’t used one before, my recommendation is to download and install Cyberduck.
It is free and easy to use, supports all major operating systems, has wide range of support for storage backends. -
After installing it (or a similar tool), go to bookmarks view.
You can also use Open Connection but it doesn’t store settings for the next run
-
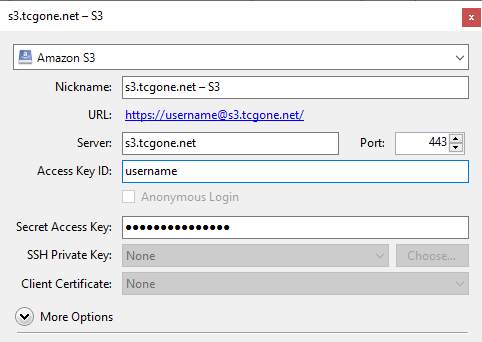
Create a new bookmark with information below, which can also be used with different type of clients as well.
Connection type: S3
Server address: https://s3.tcgone.net
Access Key: ******
Access Secret: ********************
-
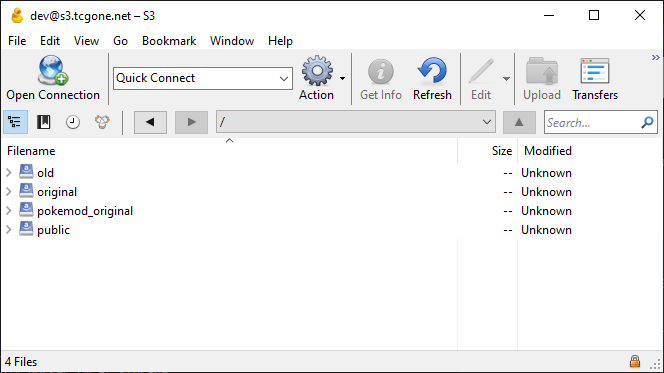
After connecting, you’ll see the folder directory, which is the same with the old Gitlab repo, and you can immediately start doing operations via drag & drop and actions menu.
Directory Information and Naming
original folder contains original, unscaled, maximum quality images in PNG or JPG formats.
pokemod_original contains originals for pokemod expansion.
public folder is the root folder served on web server. It contains optimized versions. l for large (width=400), m for medium (width=220). This is the only folder which is served to the internet.
File Naming: each expansion has its name lowercased and spaces are replaced with underscores. Each card number starts from 001 and goes up, aligning with card numbers on English releases.
Processing Images
Original images are not suitable for serving over internet as some go up to megabytes in size, therefore we first convert the image to JPEG if they were PNG, then we apply JPEG stripping to reduce their size. We use the famous ImageMagick library for doing image transformation operations.
scans.pl script is used to automate this process. Please use this script to prepare images. You’ll need to have some basic command line skills and install some programs to your computer.
You MUST have perl and magick (ImageMagick) installed!
Setup Instructions for Windows
- Install Git For Windows from https://git-scm.com/download/win. This includes perl, therefore you don’t need to install perl separately.
- Install ImageMagick for Windows from https://www.imagemagick.org/script/download.php
- Start Git Bash and run commands inside it.
Setup Instructions for Mac
- Macs already have
perlpre-installed. - Install either HomeBrew (preferred) or MacPorts.
- Install ImageMagick through either
brew install imagemagickorsudo port install imagemagick.
Runtime Instructions
-
Put new scans into original (or pokemod_original) folder, then cd into that folder (it is mandatory due to the way the script was programmed):
cd original -
The script accepts any number of files/directories separated by a space to convert. Suppose you’ve updated forbidden_light and steam_siege, run command:
../scans.pl forbidden_light steam_siege
This will put output files into ../public folder, you can then upload all new files (including originals) to the server via Cyberduck.